Sun, beach and Internet
I'm travelling to Raa atoll Ungoofaaru tomorrow and will be staying in the island for about 3 days. Sadly, it's not on holiday though - it's for some work. I am taking my computer gear ofcourse and wanted to be able to get on the internet while I'm there. Thankfully this is now possible, owing to the availability of GPRS service via Dhiraagu. The connection is awefully slooowwwww ofcourse, but it's quite usable and I'd take it happily when I'm bored and desperate.
I had tested using internet on my laptop via GPRS when Dhiraagu had the "free GPRS" week at the time of its introduction in July, but didn't have the settings anymore due to a hard disk change. So again today, I set out to setup my laptop for internet via Dhiraagu GPRS using my bluetooth enabled phone. Here is how I did it...
Installing bluetooth on the laptop
This is normally quite an easy task however it turned out to be quite a challenge as the bluetooth dongle I had now was unbranded and the drivers supplied with it refused to run on Windows 2003 Server running on my laptop. To make a long story short, I downloaded the latest Widcomm bluetooth driver (with Win 2k3 support) and installed it. Then applied the patches floating on the net to remove the vendor hardware dependant licensing. And viola! It works! Head over to http://forum.gsmhosting.com/vbb/showthread.php?t=127539 if you've been having the same problem.
Setting up GPRS
I already have GPRS setup on my phone since I use WAP and MMS occasionally. Details of how to do this for Dhiraagu customers are at http://mms.dhiraagu.com.mv.
Setting up the Bluetooth connection
In the final stage of this process, I created a Bluetooth dialup networking connection to my phone from the laptop. Right clicking the bluetooth system tray icon and selecting "Bluetooth Setup Wizard" will finish the process in a breeze.
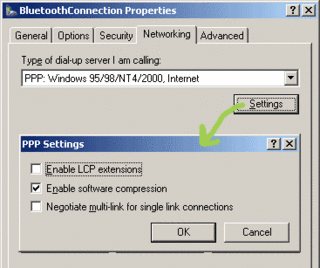
Then, the networking settings for the Bluetooth dialup connection was set as follows. Open the connection properties, click the "Networking" tab, click the "Settings" button. Untick "Enable LCP .." and "Negotiate multi-link ...".

Setting up browser
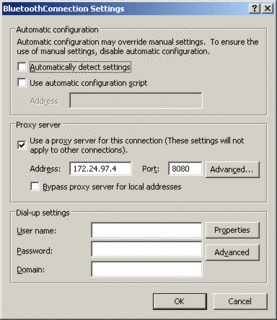
Dhiraagu requires the use of a proxy to browse and use internet. Setup your favourite browser with the proxy address as "172.24.97.4" and port as "8080".
In Internet Explorer, go to "Tools" menu, select "Options" and in the window that opens select the "Connections" tab. You should see the name of the Bluetooth connection you created. Select it and click the "Settings" button". Now, fill the various options as shown below.

Establishing the link
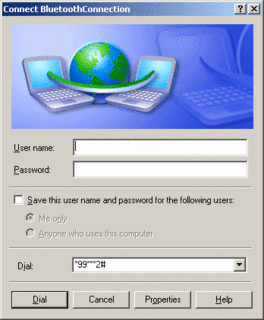
Finally, time to dial! Double click the Bluetooth connection created in the above stages. Enter the dialup number and user/pass. The dial number is of the format "*99***2#" where 2 is the CID shown on the phone for the GPRS account you want to use. The user/pass is blank.

Once the dial button is hit, a connection is attempted and shows as "Connected" if it was successful. There isn't need to worry about how long you keep it connected as you are only charged for the data that is sent and recieved.
Now I am all set to leave to the island and I can hopefully sit and use the internet where the waves crash humbly onto the beach not far from my bare feet while cooling under the shade of a tall colorful palm tree.
I had tested using internet on my laptop via GPRS when Dhiraagu had the "free GPRS" week at the time of its introduction in July, but didn't have the settings anymore due to a hard disk change. So again today, I set out to setup my laptop for internet via Dhiraagu GPRS using my bluetooth enabled phone. Here is how I did it...
Installing bluetooth on the laptop
This is normally quite an easy task however it turned out to be quite a challenge as the bluetooth dongle I had now was unbranded and the drivers supplied with it refused to run on Windows 2003 Server running on my laptop. To make a long story short, I downloaded the latest Widcomm bluetooth driver (with Win 2k3 support) and installed it. Then applied the patches floating on the net to remove the vendor hardware dependant licensing. And viola! It works! Head over to http://forum.gsmhosting.com/vbb/showthread.php?t=127539 if you've been having the same problem.
Setting up GPRS
I already have GPRS setup on my phone since I use WAP and MMS occasionally. Details of how to do this for Dhiraagu customers are at http://mms.dhiraagu.com.mv.
Setting up the Bluetooth connection
In the final stage of this process, I created a Bluetooth dialup networking connection to my phone from the laptop. Right clicking the bluetooth system tray icon and selecting "Bluetooth Setup Wizard" will finish the process in a breeze.
Then, the networking settings for the Bluetooth dialup connection was set as follows. Open the connection properties, click the "Networking" tab, click the "Settings" button. Untick "Enable LCP .." and "Negotiate multi-link ...".

Setting up browser
Dhiraagu requires the use of a proxy to browse and use internet. Setup your favourite browser with the proxy address as "172.24.97.4" and port as "8080".
In Internet Explorer, go to "Tools" menu, select "Options" and in the window that opens select the "Connections" tab. You should see the name of the Bluetooth connection you created. Select it and click the "Settings" button". Now, fill the various options as shown below.

Establishing the link
Finally, time to dial! Double click the Bluetooth connection created in the above stages. Enter the dialup number and user/pass. The dial number is of the format "*99***2#" where 2 is the CID shown on the phone for the GPRS account you want to use. The user/pass is blank.

Once the dial button is hit, a connection is attempted and shows as "Connected" if it was successful. There isn't need to worry about how long you keep it connected as you are only charged for the data that is sent and recieved.
Now I am all set to leave to the island and I can hopefully sit and use the internet where the waves crash humbly onto the beach not far from my bare feet while cooling under the shade of a tall colorful palm tree.


